I've made a list of ten reasons to hike the AT for those of you that need a little extra coercion into quitting your jobs, leaving your friends and family, and living in the woods for months at a time.
1. The hiker community on the AT is amazing. It's so tight-knit that you'll feel right at home. Hikers look out for each other. When you're on the trail, everybody you pass will say hi and chat with you. It doesn't matter what your age, demographic, or income bracket is in regular life; on the trail, people look at who you are as a person. The people in towns are great too. You might just start chatting with a random person and before you know it, you're at their house and they're cooking you dinner.
2. You get to go on an actual adventure. How often in your daily life do you actually get your blood pumping out of excitement? Walking over 2,000 miles through the woods with the goal of reaching Katahdin sounds like the kind of thing you would read about in a children's fantasy novel. Well, guess what. It's your life now.
3. Simplify your life. No emails, texts, deadlines, clients, professors, or bosses. You don't have to call anyone back. You don't have to fill up your gas tank or shave your beard. Heck, you don't even have to shower if you don't want to. Your biggest concern of the day is where you're going to find water next or where you're going to sleep tonight.
4. Your ass is going to look good in your skinny jeans when you're done. Or you'll lose all that extra weight you've been packing on for the past few years. Even if you don't care about skinny jeans, your muscles will still be rock hard when it's time to go home.
5. (For the ladies) There's tons of guys everywhere. (For men) Women will swoon at your manliness when you get home. OK, so the guys kind of get the short end of the stick when it comes to dating on the trail. These numbers aren't exact, but I've noticed about 1 girl to every 4 guys on the AT. That's right, tons of of rugged, manly men everywhere and hardly any girls at all. But don't worry guys, there will be plenty of women when you get home. You'll be in top physical shape and have an arsenal of stories to woo the ladies with. Just watch out for trail goggles.
6. Do something physically and mentally challenging. Nobody's going to tell you that hiking the AT is easy. You probably will hear that anyone is physically capable of doing it. You're essentially just putting one foot in front of the other. Yes, anyone can do it if they really want to. It's the mental part that will be the hardest. You have to make yourself keep hiking even when it's been raining for two days, the weather is scorching hot, or there's a cloud of bugs following you.
7. You have a chunk of free time in your life. Maybe you just retired, graduated college or high school, came back from Iraq or Afghanistan, or got laid off from your job. Now is a great time to go hiking. Why not have a little adventure before you go back to the real world? I once met a guy in Georgia that told me he quit his job of 8 years to hit the trail. I met a couple that didn't get into the grad school they wanted, so they went hiking instead. Even if you have to quit your stable job, so what? At least you can make your day dreams a reality.
8. See the beautiful mountain scenery. The Appalachian Trail offers some amazing views that are difficult to find elsewhere. While it's true that most of the trail just offers views of trees and dirt, there is something rewarding about hiking to the top of a mountain and being able to see for miles. Some of the largest mountains do have roads that will take tourists to the top, but you get the satisfaction of knowing you walked up. And that makes the mountains you can't drive up even better.
9. Everything you need you can carry in your backpack. There's a sense of freedom that comes with being able to go where you please and only have a responsibility to yourself. Your car, cell phone, iPad, and Facebook just seem like extras when you survive with only a backpack of possessions for months at a time.
10. It's the cheapest 4-6 month long vacation you'll ever go on. Hiking is an extremely inexpensive activity. The initial gear purchases can get pricey, but once you have your gear you don't have to worry about it. As far as the actual hike goes, your main expense will be food. Occasionally you get to stay in a hostel, but those normally only run $10-15 a night. Sometimes you can even do work-for-stay. You can definitely get by on your hike for about $1,500. However, if you have money to spend, you can stay in hotels and have big meals while you're in towns.

Tuesday, February 28, 2012

Thursday, February 9, 2012
Trail Literature
If you're thinking about hiking the Appalachian Trail, it might be helpful to read up on it. There are a lot of books available, but these are the ones I find most helpful and interesting.
Memoirs:
Becoming Odyssa by Jennifer Pharr Davis is an awesome read. A 21-year-old girl tells her story of antics, stalkers, and friendship while she hikes from Georgia to Maine. I liked this book because most trail memoirs are written by older men. This might be the only book out right now by a young, female thru-hiker.
Hiking Through by Paul Stutzman is another good read. It has a more religious tone to it. We follow the author on his journey to Maine, while he recovers from his wife's death to cancer. His message is to live life right now because you never know when your plans are going to fall through.
A Walk in the Woods by Bill Bryson is another interesting memoir. He doesn't actually hike the entire trail and many people will argue that he's not a good hiker. However, this book is really, really funny! You do get an idea of what trail life is like, and it demonstrates the hiker belief to "hike your own hike."
How-To Books:
Allen and Mike's Really Cool Backpackin' Book is an awesome instructional read. It's not geared specifically toward the Appalachian Trail, but it's still incredibly helpful. It's entertaining too. They have tons of illustrations that demonstrate the correct way to do things.
Try How To Hike the A.T. by Michelle Ray for a book that's geared toward the AT and covers probably everything you were ever wondering about thru-hiking.
Data Books:
You want a good data book to bring on your trip with you. They show landmarks, water sources, shelters, towns, elevations, and many other things. Which data book you choose is all about personal preference, but none of them will leave you lost in the middle of the woods. Get a current version because they update them every year.
The Appalachian Trail Data Book is a no frills, basic information guide. It's significantly lighter than other books because it only gives you need to know information. At the same time, it still marks shelters, landmarks, water sources, road crossings to towns and other things. It doesn't map out the actual towns or elevations.
The A.T. Guide will give you everything that's in the Data Book, plus more. It draws out the mountains with elevations and where everything is at in relation. It also has helpful information about the towns, like prices of hostels and where you can find shuttles.
The Thru-Hiker's Companion will give you basically everything that's in the A.T. Guide, minus the drawings of elevations. The elevations are written in.
Sunday, February 5, 2012
Choosing a Tent

Everyone has different preferences, so here's a few things to keep in mind while shopping for tents:
How easy is it to set up?
How much does it weigh?
How many people are going to be sleeping in it?
How much space does it have?
What's the price?
Is it ventilated well?
Keep those things in mind while you consider all the options for shelter on the Appalachian Trail.
Shelters, Huts, and Lean-Tos:
There are hundreds of shelters, huts, and lean-tos along the trail. They're basically the same thing, but with different names. These are usually placed in areas that have a water sources close by, and there is usually an outhouse too. Even if you're not staying in the shelter, there's always somewhere to tent. Many hikers prefer to get a spot in the shelter, and not set up their tents. However, you can't rely on getting a spot in the shelters every night during the first few hundred miles of the trail. There's too many other people on the trail attempting thru-hikes, but eventually they will start to drop off.
Tarps:
If you can learn to tie a few knots and don't mind laying your sleeping pad on the ground, you can use a tarp as your shelter. You'll be using cord to string the tarp up between trees. Tarps are great because they're extremely light to carry and they don't take up very much valuable pack space. Combine tarp carrying with sleeping in shelters, and you'll lower your pack weight but remain comfortable.
Free-Standing Tents:
Free-standing tents are just tents that stay up by themselves once you put the poles in. You still have to stake them to the ground, so they won't blow away. You can pay a lot of money for super lightweight tents, but in general this is the heaviest option. On the plus side, they're easy to set up and are roomy. You can set them up anywhere; you don't need trees. They're very sturdy too; they don't blow around as much in the wind and harsh weather. I've used a tent that was only partially free-standing, and it would always be caving in by morning and wasn't very sturdy. Tying guy lines will help with this problem, but I really don't like the extra hassle and carrying extra stakes. Some people don't mind though. Prices vary anywhere from $100-$600.
REI is a good place to start looking for a tent. They have a wide variety of brands and types of tents.
Other Types of Tents:
There's a variety of semi-freestanding tents available. You usually have to secure them with guy lines. They weigh less because they require fewer (if any) poles for set up. If you hike with trekking poles, there are tents that are designed to be set up with the trekking poles instead of carrying poles that only function for the tent. Check out Tarptent for lightweight tents that start around $200.
Hammocks are also becoming pretty popular on the trail. They have a rainfly that protects the netted hammock part. You don't have to worry about finding a level area of ground or sleeping on a hard surface. No poles, means less weight. You wouldn't necessarily need a sleeping pad either.
As far as hammocks go, Hennessy Hammock is the way to go. Prices start at $100.
Thursday, January 26, 2012
Water Treatment
There's a variety of options when it comes to treating your water on the trail. When choosing a method, you want to take into account the cost, added weight, efficiency, time it takes, and how much chemicals are involved. Here are a few popular options:
Many hikers choose not to treat their water at all. This saves on expenses and pack weight. While they are more susceptible to bacteria and viruses, they probably build some sort of immunity after a while. Plus, they aren't adding any extra chemicals to their bodies.
Boiling water is another option. You don't have to pay anything extra for a treatment system, but you're still purifying your water. This is a time consuming process, and it's probably not for you if you like to put in big miles daily. Also, this consumes precious fuel that could be used for cooking. However, if you don't mind building fires, then you can save your fuel supply.
Another option is the Steripen. It eliminates almost 100% of bacteria and viruses. It works by using ultraviolet light to make water safe to drink. It only takes about 30 seconds to a full minute (depending on how many liters of water you have) to sterilize your drinking water. You can spend anywhere from $60 to $120 on a Steripen, and the more lightweight ones do cost more. Also, they require Lithium batteries which are more expensive. I used my Steripen on a 3-week backpacking trip, and it broke on me. I don't know if this is the case for everyone, but the company is pretty good about replacing broken products.
Iodine tablets and chlorine are inexpensive and lightweight. They come in a small bottle and normally only cost about $10. They do discolor and add a weird taste to your water. You can solve this problem by either getting an additional bottle of taste-neutrailizer or adding Gatorade packets to your water. You will usually have to wait at least a half hour before your water is safe to drink. You can get these treatment systems at most athletic stores that have a camping section. Along a similar line, I have heard of people who add 2 drops of regular bleach to their water. I'm not sure how healthy this is for your body, but it can't be much worse than iodine.
Water filters are another option for water treatment. This method, unlike the others listed above, gets rid of debris so you don't have any dirt floating in your water. Water filters get rid of parasites and bacteria, but not viruses. It doesn't change the taste of your water either. When buying a water filter, you should consider how often it needs to be cleaned and how often the filter needs to be replaced. There's a variety of different brands to choose from, and the cost can run anywhere from $20 to $250. While there are lightweight filters available, for the most part this method adds the most weight to your pack.
Not one method is right for everyone. If you're not sure, I would choose the most inexpensive method to start with or buy the product second-hand. Then if you're not happy, you can choose a more expensive option.
To Hike Alone or with a Partner
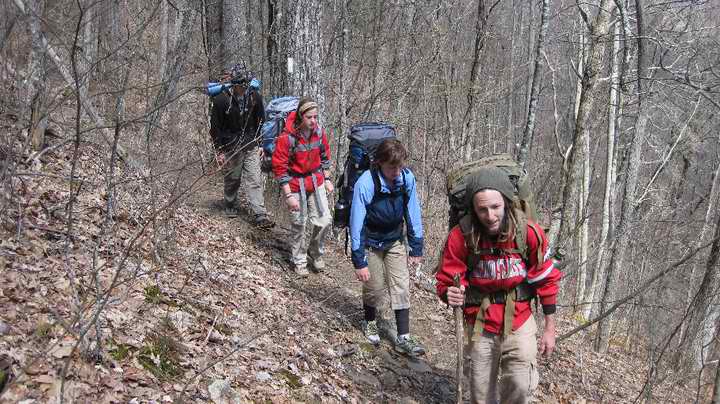 |
If you're planning on thru-hiking, chances are you won't be able to convince any of your friends to quit their jobs and come hiking with you. But who knows, you might get lucky. Having a hiking partner is great because you're never lonely, you have someone to help you with tasks, and you're family and friends at home don't have to worry about your safety so much. You guys can split the weight of gear, such as the tent, cooking stove, and data books. It saves time too; one person can fill up the water bottles while the other person sets up the tent. If you're thinking about hiking Southbound, the trail can get pretty lonely because most hikers choose to go Northbound. Having a partner will still give you the sense of solitude in the wilderness, but you'll still have a bit of company.
Solo hiking is a great experience too. You get to hike at your own pace, do as many or as few miles as you want, and you don't have to consult with anyone if you want to make a detour. You'll still meet awesome people on a daily basis because the trail is such a tight-knit community. It's also easier to plan your hike financially if you're hiking alone. If you have some extra money to spend, you can seek out the comforts of hostels and motels regularly. Or if you're on a tight budget, you don't have to feel guilty because your partner is missing out on that hot shower and nice meal that they wanted. Hiking solo also gives you a huge sense of independence and self-reliance. Not everybody has the will-power to go into the wilderness alone and do something as challenging as a thru-hike.
Even if you start a hike solo but really want a partner, the opportunity is still there. During the first few hundred miles, other individuals are also seeking companionship. This is a great time to find someone that shares your hiking style. But be careful not to jump into something permanent just because you're lonely. You don't want to end up with a hiking partner that annoys you. Hold out, and you can definitely find a hiking partner that you love having around.
The last, and in my opinion best, option is to have friends meet you on the trail for short periods of time. It's always a good time to get a taste of home. After hearing of your plans for a thru-hike, many of your friends will probably be curious about what it's like to spend some time on the trail. Maybe you can even convince your parents to join you for awhile. Not to mention, you friends will go home and tell stories of how awesome you are at building fires and locating water sources.
Regardless of if you decide to hike solo or with a partner, you'll find a feeling of camaraderie and a sense of kinship among fellow hikers. There's a saying on the AT: Instant family. Just add trail.
Thursday, January 19, 2012
Dehydrate Fruit and Vegetables in the Oven
It's difficult to get enough fruit and vegetables on the trail. They're very heavy to carry and bruise easily. However, if you dehydrate them ahead of time, they're awesome to have. You can snack on the fruit during the day. Veggies can be re-hydrated and cooked for dinner.
You can always buy dehydrated food in the store, but it will be expensive. There are also some great dehydrators that you can purchase. The cheapest method, however, is to dehydrate food in your oven.
Things you'll need:
 Step 1: Preheat oven to anywhere from 130-180 degrees. Rinse your fruit or veggies off in the sink. Then peel the skin off, and cut off any bruises. Slice into even sized pieces.
Step 2: Make a mixture of lemon juice and water. It should be about 1 part lemon juice to every 5 parts water. You're going to soak your fruit or veggies in this mixture for at least 5 minutes. I find it easiest to toss my veggies in as I cut them.
Step 3: Dry fruit or veggies off with a clean towel. Put a piece of parchment or wax paper on a baking sheet. Put the fruit or veggies on the baking sheet, but don't overlap. If you oven doesn't go as low as 180 degrees, you can stick a towel in the door so some of the heat circulates out.
You can always buy dehydrated food in the store, but it will be expensive. There are also some great dehydrators that you can purchase. The cheapest method, however, is to dehydrate food in your oven.
Things you'll need:
- your fruit or veggies of choice (apples, bananas, papayas, onions, potatoes, peppers, etc.)
- lemon juice
- an oven
- baking sheet
- parchment or wax paper
- a large jar
Step 2: Make a mixture of lemon juice and water. It should be about 1 part lemon juice to every 5 parts water. You're going to soak your fruit or veggies in this mixture for at least 5 minutes. I find it easiest to toss my veggies in as I cut them.
Step 3: Dry fruit or veggies off with a clean towel. Put a piece of parchment or wax paper on a baking sheet. Put the fruit or veggies on the baking sheet, but don't overlap. If you oven doesn't go as low as 180 degrees, you can stick a towel in the door so some of the heat circulates out.
 |

Subscribe to:
Posts (Atom)